Sleep Apnoea Service
Our team pioneer a physiologist-led Sleep Apnoea service, which includes a consultation and testing for Sleep Disordered Breathing conditions, and also analysis of sleep studies, making diagnoses and acting upon results.
We also provide a CPAP (Continuous Positive Airway Pressure) service for those patients diagnosed with Obstructive Sleep Apnoea and an ASV (Auto Servo Ventilator) service for those diagnosed with Central Sleep Apnoea. This includes initiation of treatment and long-term follow-up.
The service is overseen by Dr Aneurin Buttress – Respiratory Physician
Secretary: Angela Korsman – 029 2181 5024 or Angela.Korsman@wales.nhs.uk
Sleep Hygiene
For tips on how to develop healthy sleep habits, click here to download a leaflet with some advice.
What is Sleep Apnoea?
Sleep apnoea is a condition that results in an abnormal number of pauses or stoppages in your breathing whilst asleep. These can be categorised into obstructive sleep apnoea (OSA) and central sleep apnoea (CSA).
Obstructive Sleep Apnoea occurs when a person stops breathing during their sleep because their airway collapses upon itself. This stops the air from reaching the lungs presenting as a choking sensation or restlessness. Complaints of loud snoring and periods of stopping breathing may be noted from your partner. After a period of time, the brain wakes you up to a light sleep to restore the airflow because of the lack of oxygen in the blood. The collapsing occurs again as you fall back into a deeper sleep and this cycle occurs all night although you might not be aware of it.
Central sleep apnoea due to an underlying medical condition affecting the nervous system (either brainstem or nerves going to the muscles). Several medical conditions may lead to CSA including neurological, craniofacial abnormalities, neuromuscular conditions or injury/abnormality of the brainstem. Certain medication can also suppress respiratory drive resulting in central sleep apnoea.
What causes the airways to collapse during sleep?
- Large tissue at the back of the throat e.g. tonsils, uvula
- Excess fatty tissues around the neck – more likely in overweight individuals
- Nasal obstructions
- Certain facial bone structures e.g. recessed chin
- Excess alcohol or drugs
- Poor muscle tone to hold the airways open
What effects does it have on the sufferer?
- Daytime sleepiness
- Irritability
- Morning headaches
- Sexual dysfunction
- Lack of concentration
- Increased night time urination
What effects does it have on health?
If you do not receive treatment for OSA there is an increased likelihood of:
- High blood pressure
- Heart disease and heart attacks
- Stroke
- Fatigue related accidents at work or driving
- Type 2 Diabetes
- Decreased quality of life
Diagnosing OSA
Sleep Apnoea Diagnostics – Overnight Oximetry and Multi-channel Sleep Studies
- Overnight Oximetry
- Apnealink – video instructions for patients - how to set up
- Multi-channel Sleep Study / Nox – video instructions for patients - how to set up
Patient Leaflet for Sleep Monitors
Treatment for Obstructive Sleep Apnoea
We use CPAP (Continuous Positive Airway Pressure), APAP (Automatic Positive Airway Pressure) and BiPAP (BiLevel Positive Airway Pressure) to treat Obstructive Sleep Apnoea.
Patient Leaflet for CPAP Initiation
We use a variety of manufacturers for machines and masks, please see below:
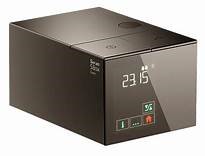
- SEFAM S-BOX
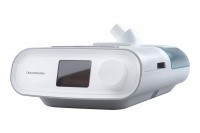
- DreamStation 1
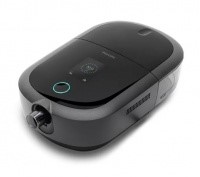
- DreamStation 2
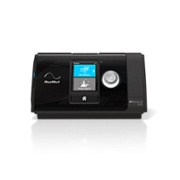
- ResMed S10
Sefam S-BOX
Cleaning and Maintenance - WARNING! Unplug prior to cleaning
Daily
Humidifier chamber (if humidifier is installed)
Remove the humidifier chamber: To remove the humidifier chamber from the device, press the button to unlock the humidifier chamber and at the same time, pull the humidifier chamber using the integrated handle. Put the humidifier chamber away from the device and pull the opening clip upwards to release the upper part of the chamber. Empty the water if any. Rinse with clean water. Allow to dry by draining, away from the sun. Re-install the humidifier chamber, once it is dry. Fill the bottom part of the humidifier chamber, then press down on the upper part to close the chamber and lock it. Place the humidifier chamber back on the heater plate, hinge side towards the inside of the machine, and push it against the device until you hear a "click".
Weekly
Humidifier chamber (if humidifier is installed)
Remove the humidifier chamber as above. Empty the water if any. Clean the different parts of the chamber with warm water and a mild detergent (e.g. using 3 drops of dishwashing liquid diluted in water). Rinse thoroughly with water to remove any trace of detergent. Allow to dry by draining, away from the sun. Re-install the humidifier chamber, once it is dry, as above. The different parts of the humidifier chamber can also be cleaned in a dishwasher (maximum 70°C). Do not leave stagnant water in the chamber in order to prevent the development of micro-organisms.
Washable filter
Remove the air intake grid. Pull the filter towards you to remove it. Wash the filter with lukewarm water and a mild detergent (e.g. using a drop of dishwashing liquid diluted in water). Rinse thoroughly to remove any trace of detergent. Drying the filter: press the filter in a clean absorbent cloth, then, let it dry totally away from the sun. Once dried, place the filter at the back of the device and put back the air intake grid. Do not use a partially dry filter.
Monthly
Device
Clean the outside of the device with a damp cloth (rag, paper towel) sprinkled with a little water and a drop of mild detergent. Remove traces of detergent by repeating this procedure with a new cloth, (rag, paper towel) slightly moistened with only water. Wipe the device completely dry with a dry cloth (rag, paper towel). Inspect the device and all circuit parts for damage after cleaning. Replace any damaged parts.
Filters
The optional fine filter cannot be washed. It must be changed once a month or more, if it is visibly dirty. Change filters as soon as they are torn or stained. It is recommended to change the washable filter every 6 months.
Humidifier (if installed)
Once the humidifier chamber has been cleaned, the patient can let it soak for 15 minutes in a solution of 9 volumes of water and one volume of white vinegar. Rinse thoroughly with water to remove any trace of vinegar. Allow to dry by draining, away from the sun. When the humidifier chamber has been removed and emptied, the heated plate can be cleaned by following same cleaning procedure as the device. Reinstall it once it is dry. Put the humidifier chamber back in place, as above.
Videos: Getting started with S.Box, How to easily open the S.Box humidifier chamber, Sefam Access mobile app to track your sleep
Manual: Sefam S.Box Patient Manual
DreamStation 1
Cleaning and Maintenance - WARNING! Unplug prior to cleaning
Daily
Humidifier (if humidifier is installed)
Hand wash the water tank and seal daily or wash it in a dishwasher, weekly. Allow the humidifier heater plate and water to cool down for approximately 15 minutes before removing the water tank. Before cleaning the humidifier, always remove the humidifier from the therapy device. Open the humidifier lid with the release lever and remove the water tank from the humidifier. Empty any remaining water from the base of the tank. Carefully separate the seal from the tank. Wash the water tank and seal in the dishwasher (top shelf only) or in a solution of warm water and a mild liquid dish washing detergent. Use 1 teaspoon (5 milliliters) of liquid dish washing detergent per gallon (3.8 liters) of water. Rinse with potable water for at least 1 minute. Inspect the water tank and seal to ensure that it is visibly clean. Wipe it again completely with a cloth dampened with water if necessary. Wipe completely on the top and bottom. Allow the water tank and seal to air dry completely. Inspect the water tank and seal for damage. Before using the water tank, place the seal back into the tank, and fill it with potable water no higher than the maximum fill line.
Fortnightly
Filter
Lift up on the filter access door and swing open. Pull out the old filter assembly. Rinse the reusable blue pollen filter at least once every two weeks and replace it with a new one every six months. The disposable light-blue ultra-fine filter should be replaced after 30 nights of use or sooner if it appears dirty or damaged. DO NOT rinse the ultra-fine filter. Never install a wet filter into the device. You must ensure sufficient drying time for the filter. Place the new/clean filter assembly back in the side of the therapy device. Swing the door closed.
Monthly
Device
Wipe the outside of the device with a cloth slightly dampened with water and a mild detergent. Let the device dry completely before plugging in the power cord. Inspect the device and all circuit parts for damage after cleaning. Replace any damaged parts.
Videos: DreamStation Setup Without Humidifier, DreamStation Setup With Humidifier, Adjusting Humidification, Cleaning
Manual: DreamStation User Manual, DreamMapper app to track your sleep
DreamStation 2
Cleaning and Maintenance - WARNING! Unplug prior to cleaning
Daily
Humidifier
Hand wash daily. The humidifier water tank can also be washed in the top rack of a dishwasher weekly. Press the therapy button to stop the airflow, and allow the heater plate and water to cool. Gently press down on the indented area on the top of the humidifier water tank to unlatch the tank from the device. Grip the top and bottom of the humidifier water tank and slide it out away from the device. Remove the lid by pulling up on the lid tab while holding the water tank base. Pour out any remaining water and rinse the water tank base. Wash the humidifier water tank (lid, water tank base, and water tank seal) in the dishwasher (top shelf only) or in a solution of warm potable water and a mild liquid dishwashing detergent (5 ml of liquid dish soap per 3.8 liters of warm water) using a soft bristle brush to remove adhering substances. Fully immerse and rinse each item separately with potable water for one minute and agitate vigorously. Allow all parts to air dry. Inspect the humidifier water tank for damage. Re-install the water tank seal. To install, insert the seal into the back of the tank base and then press the seal down until it is fully seated into the water tank base. Slide the humidifier water tank back into the device, using the tracks on the bottom of the water tank base for proper alignment and connection. Ensure that it is latched into place before proceeding.
Videos: DreamStation 2 Setup, DreamStation 2 Cleaning and Maintenance
Manual: DreamStation 2 User Manual, DreamMapper app to track your sleep
ResMed S10
Cleaning and Maintenance - WARNING! Unplug prior to cleaning
Daily
Humdifier
Empty the humidifier daily and wipe it thoroughly with a clean, disposable cloth. Allow to dry out of direct sunlight and/or heat. Check the humidifier: Replace it if it is leaking or has become cracked, cloudy or pitted. Replace it if the seal is cracked or torn. Remove any white powder deposits using a solution of one part household vinegar to 10 parts water.
Weekly
Wash the humidifier in warm water using mild detergent. Rinse the humidifier thoroughly and allow to dry out of direct sunlight and/or heat. Wipe the exterior of the device with a dry cloth. The humidifier may be washed in a dishwasher on the delicate or glassware cycle (top shelf only). It should not be washed at temperatures higher than 65ºC.
Six Monthly
Check the air filter and replace it at least every six months. Replace more often if there are any holes or blockages by dirt or dust. The air filter is not washable or reusable.
Videos: Airsense 10 Set up, My Air web program to track your sleep
Manual: Airsense 10 Autoset
Masks:
- ResMed Airfit F20 [fitting video] [cleaning video]
- F+P Vitera [fitting video] [cleaning video]
- F+P Evora FFM [fitting video] [cleaning video]
- F+P Evora Nasal [fitting video] [cleaning video]
- Philips Wisp [fitting video] [cleaning video]
- Philips Dreamwear Nasal [fitting video] [cleaning video]
We have a one mask per year policy. If you require a spare mask for ease of cleaning or travel, please purchase your own privately.
Once established, your follow up procedure depends on your driving status, if you are a driver you are required by law to be reviewed a minimum of once every 3 years, however those with a group 2 licence will need to be reviewed yearly — Driver and vehicle licensing agency DVLA.
ASV Treatment for Central Sleep Apnoea
We use ASV (Autoservo Ventilators) for the treatment of Central Sleep Apnoea.
Please see point 2 (CPAP Therapy) above for guidance on mask fitting and maintenance.
You will remain under long term follow up of the Sleep Apnoea service, and once established we will aim to see you once per year.
Inpatient Care
If you become an inpatient, you will need to take your APAP/CPAP/ASV device with you into hospital, or ask a family member or friend to bring it for you. You should continue to self-manage your therapy.
Should you require assistance, please contact the department on – SLEEP HELP LINE 029 2182 5806 or EMAIL: sleephelp.cav@wales.nhs.uk
Other Useful Sources
- Asthma + Lung UK: Obstructive sleep apnoea (OSA) | Asthma + Lung UK (asthmaandlung.org.uk)
- Sleep Apnoea Trust: Sleep Apnoea Trust - A patient support charity (sleep-apnoea-trust.org)
- Hope2Sleep: Sleep Apnoea, Snoring + Sleep Disordered Breathing Charity - Hope2Sleep Charity
- NHS: Sleep apnoea - NHS (www.nhs.uk)
- Healthy Living Wales Support: Home - Healthy Weight Healthy You
- DVLA Tiredness Can Kill
- Taking your CPAP on an aeroplane? Contact us for a letter.
- BLF OSA Booklet
- NICE Guidelines